kickstart自动安装Linux
目标
使用kickstart安装Linux
名词解释
- kickstart
Kickstart 安装提供了一种方法来部分或全部自动化安装过程。Kickstart 文件包含安装程序通常询问的所有问题的答案,例如您希望系统使用的时区、应如何对驱动器进行分区,或者应该安装哪些软件包。因此,在安装开始时提供准备的 Kickstart 文件可让您自动执行安装,而无需用户进行任何干预。这在部署 Red Hat Enterprise Linuxnbsp 时特别有用;当部署 Red Hat Enterprise Linuxnbsp 时;一次性在大量系统中使用 Linux。
Kickstart 文件可保存在单一服务器系统中,并在安装过程中由独立计算机读取。这个安装方法支持使用单一 Kickstart 文件安装 Red Hat Enterprise Linuxnbsp; 在多台机器上使用 Enterprise Linuxnbsp;Linux,使其成为网络和系统管理员的理想选择。
所有执行它们的 Kickstart 脚本及其日志文件都存储在 /tmp 目录中,以帮助调试安装失败。
- kickstart安装流程
Kickstart 安装可以使用本地 DVD、本地硬盘驱动器、NFS、FTP、HTTP 或 HTTPS 执行。
- 要使用 Kickstart,您必须:
- 创建一个 Kickstart 文件。
- 在可移动介质、硬盘或网络位置上提供 Kickstart 文件。
- 创建用于开始安装的启动介质。
- 使安装源可用。
- 启动 Kickstart 安装。
实操演示
操作流程
- 1.创建kickstart文件
- 2.搭建HTTP服务发布kickstart文件
- 3.安装过程中指定kickstart文件
- 创建kickstart文件
RHEL7:使用system-config-kickstart工具
RHEL8:查看本地现有的kickstart文件,/root/anaconda-ks.cfg和/root/initial-setup-ks.cfg
- anaconda-ks.cfg
#version=RHEL8
ignoredisk --only-use=sda
##使用的磁盘
autopart --type=lvm
##自动创建分区 类型为lvm
# Partition clearing information
clearpart --none --initlabel
##清除磁盘上的分区并格式化
# Use graphical install
graphical
##使用图形化安装
# Use CDROM installation media
cdrom
##安装媒介
# Keyboard layouts
keyboard --vckeymap=cn --xlayouts='cn'
##系统语言
# System language
lang zh_CN.UTF-8

# Network information
##网卡设置,默认协议为dhcp,驱动名称等
network  --bootproto=dhcp --device=ens33 --ipv6=auto --activate
network  --hostname=localhost.localdomain
repo --name="AppStream" --baseurl=file:///run/install/repo/AppStream
##软件安装源
# Root password
rootpw --iscrypted $6$71udcCfiS/myNf9c$PrL709M5ishN86PXAbRxdRA/fKGdo0MOHHfOqkhuaKJwGJEvI0vvr21geh774CDN/bWJquyHnNxcvbhwrW6fC.
# X Window System configuration information
xconfig  --startxonboot
# Run the Setup Agent on first boot
##恢复出厂设置开启
firstboot --enable
# System services
##时间同步服务启动
services --enabled="chronyd"
# System timezone
##系统时区
timezone Asia/Shanghai --isUtc
##安装的软件包
%packages
@^graphical-server-environment
@file-server
@graphical-admin-tools
@security-tools
@smb-server
@system-tools
kexec-tools

%end

%addon com_redhat_kdump --enable --reserve-mb='auto'

%end

%anaconda
pwpolicy root --minlen=6 --minquality=1 --notstrict --nochanges --notempty
pwpolicy user --minlen=6 --minquality=1 --notstrict --nochanges --emptyok
pwpolicy luks --minlen=6 --minquality=1 --notstrict --nochanges --notempty
%end
- 将.cfg文件放置在可访问的网络位置
可以使用nginx或者apache的文件服务进行发布cfg文件
- nginx配置文件
user nginx;
worker_processes auto;
error_log /var/log/nginx/error.log;
pid /run/nginx.pid;

include /usr/share/nginx/modules/*.conf;

events {
    worker_connections 1024;
}

http {
    log_format  main  '$remote_addr - $remote_user [$time_local] "$request" '
                      '$status $body_bytes_sent "$http_referer" '
                      '"$http_user_agent" "$http_x_forwarded_for"';

    access_log  /var/log/nginx/access.log  main;

    sendfile            on;
    tcp_nopush          on;
    tcp_nodelay         on;
    keepalive_timeout   65;
    types_hash_max_size 2048;

    include             /etc/nginx/mime.types;
    default_type        application/octet-stream;

    include /etc/nginx/conf.d/*.conf;

    server {
        listen       80 default_server;
        root         /usr/share/nginx/html;

        # Load configuration files for the default server block.
        include /etc/nginx/default.d/*.conf;
        default_type text/plain;
        location / {
        root html;
        autoindex on;   #设置允许列出整个目录
        autoindex_exact_size off;
        #默认为on,显示出文件的确切大小,单位是bytes。改为off后,显示出文件的大概大小,单位是kB或者MB或者GB
        autoindex_localtime on;
        #默认为off,显示的文件时间为GMT时间。改为on后,显示的文件时间为文件的服务器时间
        charset utf-8;
        }
        error_page 404 /404.html;
            location = /40x.html {
        }
        error_page 500 502 503 504 /50x.html;
            location = /50x.html {
        }
    }

}
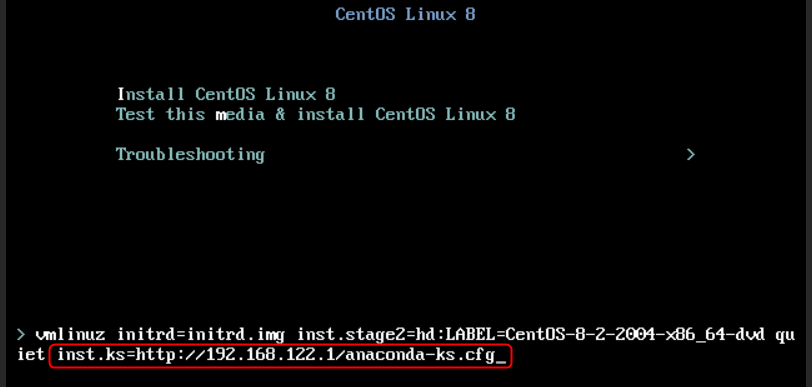
- 配置主机安装指定机器的.cfg文件
进入到安装界面是按TAB键进入编辑模式,输入以下图中内容即可。
cockpit管理界面
文档更新时间: 2023-01-10 16:35 作者:xiubao yan